
A while back we covered some troubleshooting solutions to speaker problems that we hear about all the time. For this article, we’re going to focus on home theater issues that are the result of folks not always making the best choices. If some of these examples look a bit familiar, fear not, they will all be easily remedied by following our recommendations. Let’s dive in and start tackling the obstacles and finding fixes!
1. Placing Tower Speakers Too Close to a Wall
Take a look at this Verus II Grand set up, it looks amazing right? Indeed it does, but there’s one minor issue that can be quickly addressed to improve its performance, which is the placement of the left tower. It’s nearly touching that sidewall and because of that, the bass is probably reverberating too much and the speaker likely sounds muddy. Basically when a tower speaker, or any speaker with a good amount of bass, is too close to a wall, you start to hear the room vibrate instead of the sweet, sweet music coming from the speaker.
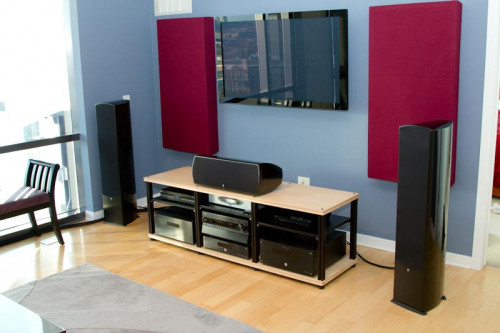
For a rear ported tower speaker like the Verus II Grand, you really want to give it at least a foot on all sides from any walls and if you can, two feet is even better. For front ported speakers like the Intimus 4T and 5T, you still want to give them at least a foot, because sound will still wrap around the cabinet from the front. The absolute worst thing you can do is to place your front speakers in a corner or alcove. People get tempted to place their TVs in a corner in open floor plans, but it’s a recipe for your front speakers to be too close together. When front speakers aren’t properly spaced apart, you lose stereo imaging and the 3D spaciousness that a correctly set up stereo system can provide. Instead of a realistic soundstage with each instrument having space to breathe, things can sound compressed and undefined. On top of that, the corner walls will really increase the dB level of the bass frequencies. In fact a corner can increase the bass response of a speaker by up to 16 times! So you can see how placing your fronts in a corner is a bad idea that can easily result in a very unbalanced sound.
2. Other Non-Ideal Speaker Placement
Beside placing a tower speaker away from a wall, there are some other rules of thumb to follow when you are positioning speakers in your room. An extremely common impulse we see is for folks to place their center channel pushed back on a shelf. Whether they are concerned with knocking the speaker off the shelf or just like the way it looks with the speaker pushed back, people often times don’t place their speaker on the edge of the shelf initially. But you don’t want to leave any empty shelf in front of a center channel because the reflections off the hard surface in front of the speaker will cause a peak in the midrange and de-emphasize the other frequencies.

Another common placement people attempt when they have difficult rooms is to put their surrounds in front of their seating position. Now you can place the surrounds ever so slightly in front of you, a few inches if you have to, but anything more than that and you will start to lose the surround effect of the speakers. Once the surrounds are a couple feet in front of you, the sound fields between them and the fronts begin to merge and you only perceive two speakers instead of four. Sure sounds coming from the surrounds may be a bit louder because they are closer, but you will not hear sounds as they are moving between the speakers any longer.
3. The Battle Between TV and Center Channel
It’s the age old conundrum, the ideal placement for your TV is eye level and the best placement for your center channel is ear level. Well, bad news, it turns out that your ear and eyes, at least for most of us humans, are roughly at the same level. Because of this, you either see TVs placed way too high, which is frequent when it is placed over a fireplace, or you see center channels that are either too high or too low. Bearing in mind that there will need to be some compromise between the two, the best placement option is to have the TV at eye level and the speaker just below it or conversely the center channel at ear level and the TV just above eye level. No matter what you do though, don’t place everything several feet off the ground as you’ll end up with not only a sore neck from looking up, but also subpar dialog intelligibility. Or hey, maybe go for this placement if your goal is to stop watching so much TV and to go outside once in a while. Just kidding, we would never recommend that!
4. Buying Speakers Without an In-Home Audition
We hear about it all the time from people we talk to, the speakers they purchased sounded absolutely incredible when they listened to them at the store, but not once they were installed in their home theater. It sounds obvious, but the demo rooms in stores have been specifically designed and treated to make speakers perform optimally. By contrast, if you are just listening on the floor of a big box store, there’s so much background noise that who can say how the speaker really sounds? In both instances, the listening environment is going to be nothing like your home. Without a doubt, home speakers that you hear at a store will sound drastically different once you get them in your own home due to the size of your room, placement, furniture, electronics, floor material and ceiling height, just to name a few factors. In fact, your room is a larger part in affecting your speakers sound than the receiver or amp you use!
We do it too, here at the Aperion Audio showroom, we’ve spent a large amount of time placing and calibrating our speakers and electronics, as well as adding room treatments to quiet the space in order make sure our speakers sound their absolute best. But the difference with our business model is that getting the speakers home and setting them up is just the beginning of the audition process. With our 60 day in-home audition, you’ve got plenty to time to listen and make any adjustments needed in placement or even try out different receivers and amplifiers if you’re a real gearhead with more than one laying around. It can’t just be us with “spare” receivers waiting in the wings, right?
5. Buying an Underpowered Receiver
This is an easy trap to fall into because so many manufacturers play games with the specs. In fact, we recently even dedicated an entire blog to sorting out how much power a receiver will provide in the real world. Also, many of the reviews out there focus on video processing and features, but don’t really provide much evaluation in terms of sound quality. These reviews may lead you to buy a receiver with all kinds of bells and whistles while lacking a quality amplifier section. But a lot of times folks just don’t set aside enough budget for the receiver. Considering that your receiver controls how everything looks and sounds in your setup, it definitely doesn’t pay to skimp on this link of the chain.
Put it this way, if you’re thinking of buying a 5.1 or 7.1 system in the $2K-$4K range as many of our systems are, a $400 receiver is not going to allow the true quality of the speakers to shine through. A good rule of thumb is that most of the receivers that can really power a system a well will start in the $700-$800 range and to really get a beefy receiver that will provide all the juice your speakers crave, you should consider spending $1000-$1500.
Another route you can take is to buy a receiver with pre-outs and then power your fronts and possibly center with an external power amp. While a separate power amp will get much more power to your speakers, keep in mind that you’ll be spending north of $2500 for a setup like this.
6. Not Calibrating Your Receiver and TV
You’ve come this far, you did your research and got the perfect speakers, receiver and TV, but make sure you don’t skip the last step, calibrating your system to get the most out of it! As far as the receiver goes, almost all of them include some form of auto setup software. Now sometimes you can get better results from a manual set up, but the auto set up is definitely a little quicker and can also do a very good job. If you do use the auto set up feature of your receiver, make sure you follow the instructions for the microphone placement, as this is critical. Placing the mic on the back of the couch isn’t the best option as any obstructions can affect the quality of the test tones it needs for setup. Use a tripod if possible and place the tip of the microphone exactly where the listener’s head will be when sitting down. Use as many mic positions throughout the room as you can so that the software can accurately measure the acoustic properties of your room.
.jpg)
One last tip, when using the auto set up, turn the level of your subwoofer down to maybe 1/3 or 1/2 volume and always double check your channel level when the calibration is done. If you see large variances in volume level, especially from the surrounds or subwoofer, chances are you didn’t get a clean reading and should try again. If you do go for a manual set up, you can find some tips for adjusting the settings here.
As for the TV, these days some calibration is something you simply must do. At the very least you’ll want to turn down the brightness that they use for in-store demonstrations and turn off the dreaded “soap opera” effect aka motion smoothing. Beyond that, it’s a good idea to go through each of the settings in your TV and to adjust them to your viewing conditions and preferences. If you want something a bit more technical, but also more generic, you can search for your model’s ISF settings and use those recommendations to dial in everything. Spend a little time making either your own adjustments or use the ones from ISF and you’ll be amazed at just how much better your display will look.
7. Listening to or Watching Low Quality Source Material
Finally, once you’ve calibrated your system and everything is ready to rock, pay attention to what you are going to be running through it! We hear about people that are having issues with audio and video quality all the time and it turns out they are either listening to low quality mp3s or just watching broadcast TV. Especially if you are watching standard definition TV on an HDTV or 4K display, it’s going to look pretty terrible. Remember, your system is only as good as its weakest link and that goes for the material you watch and listen to as well. You’ve spent the time and money on your gear, make sure that the sources are high quality too! Stick to HDTV and Blu Ray for your TV and CDs, SACD or lossless audio downloads for music.
Now that you now what not to do, go forth and enjoy the best that your system has to offer and as always, happy listening!